
You may have seen wedding photographs in which the bride’s face glows softly, the groom’s silhouette stands against a warm sunset, and the entire scene looks romantic without appearing heavily edited. The secret behind many of these photographs is not an expensive camera or an elaborate lighting setup. It is often the timing of the shot.
Photographers call this period the golden hour. It is one of the most useful times of day for natural-light photography, especially for couple portraits, pre-wedding shoots, bridal portraits and outdoor wedding photography.
Understanding golden hour can help you take better photographs, plan a more effective photoshoot and make the most of the natural light available at your location.
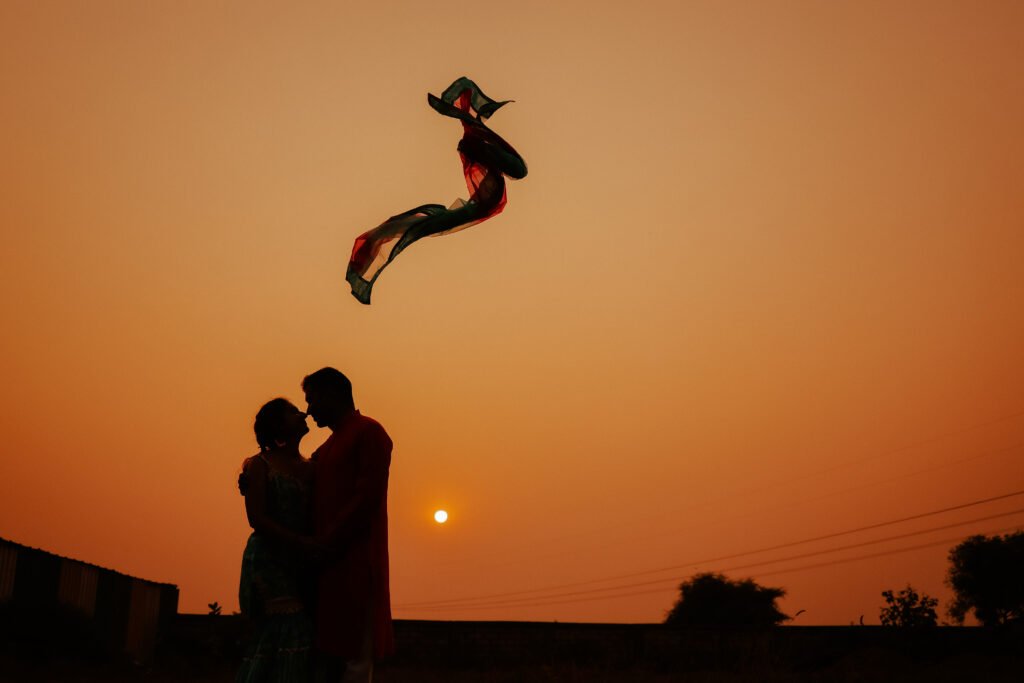
What Is the Golden Hour in Photography?
The golden hour in photography is the period shortly after sunrise and shortly before sunset, when sunlight arrives at a low angle and often appears warmer, softer and more flattering than it does around midday.
During this time, sunlight travels through a greater thickness of the atmosphere, changing its colour and reducing the intensity of direct illumination. The lower position of the sun also creates longer shadows and attractive side lighting.
Although photographers call it an hour, the golden hour does not always last 60 minutes. Its duration depends on the season, geographical location, weather and the sun’s position.
Golden hour is particularly useful for:
Wedding and pre-wedding photography
Bridal and groom portraits
Couple photography
Outdoor portraits and fashion photography
Landscape and nature photography
Travel, architecture and lifestyle photography
The defining feature is not simply the orange colour of the sunlight. It is the combination of warm tones, directional light and a lower sun that allows photographers to create depth without relying entirely on artificial lighting.
When Does Golden Hour Happen?
There are two golden-hour periods during a typical day.
1. Morning golden hour
Morning golden hour occurs shortly after sunrise. The light is usually gentle, the surroundings can feel quieter, and outdoor locations may have fewer people moving through the frame.
This period works well for landscape photography, travel photographs and couples who prefer a peaceful pre-wedding session. However, an early start may be inconvenient if the couple needs considerable time for hair, makeup and wardrobe preparation.
2. Evening golden hour
Evening golden hour occurs shortly before sunset. It is often the preferred option for romantic portraits because the low sunlight can create warm skin tones, glowing hair and beautiful background separation.
For wedding couples, this is an opportunity to capture relaxed photographs away from the main ceremony, provided the event schedule allows enough time.
A practical tip: Do not plan to begin your shoot at the exact sunset time. Reach the location early, identify the best shooting angles and begin photographing while useful sunlight is still available.
Why Is Golden Hour Light So Special?
The difference between golden-hour photographs and harsh midday photographs becomes clearer when you understand how light affects a subject.
Softer-looking light and more manageable shadows
When the sun is high overhead, it can create dark shadows beneath the eyes, nose and chin. This is particularly noticeable in outdoor portraits.
During golden hour, the sun sits lower in the sky. Its light arrives from the side rather than directly overhead, making it easier to create attractive facial contours and more dimensional photographs.
The light is not automatically soft in every situation. Direct sunlight can still create contrast, especially when the sky is clear. A photographer must choose the direction carefully and may need a reflector, diffuser or supplementary light.
Warm and natural colours
Golden-hour sunlight often adds yellow, amber and orange tones to a photograph. These colours can complement bridal outfits, floral arrangements, skin tones and outdoor backgrounds.
The key is restraint. Excessive warmth during editing can make skin appear unnaturally orange and can distort the colours of clothing. Good golden-hour photography should preserve the atmosphere of the light without making every photograph look artificially yellow.
Attractive backlighting
Backlighting occurs when the main light source is positioned behind the subject.
During a couple’s portrait session, the photographer can position the sun behind the bride and groom to create a delicate outline of light around their hair and shoulders. This effect is often called rim lighting.
It can look particularly effective with a bridal veil, flowing dupatta, embroidered outfit or a groom’s sharply defined silhouette.
The photographer must still expose the faces correctly. If the camera prioritises the bright sky, the couple may appear too dark. Moving the subjects slightly, adjusting exposure or adding fill light can solve this problem.
Longer shadows and greater depth
Low-angle sunlight produces long shadows that can add structure to a photograph. A simple outdoor location may look more interesting when the light creates patterns across the ground, highlights architectural details or separates the couple from the background.
These shadows are not always something to eliminate. Used deliberately, they become part of the composition.
Golden Hour Photography for Weddings
Wedding photography benefits from golden hour because the light can support both emotional storytelling and carefully composed portraits.
At Studio Rollii, our approach to wedding photography focuses on preserving the moments and atmosphere that make a celebration personal. Understanding natural light is an important part of planning outdoor portraits and pre-wedding photographs.
Here are some ways couples can make use of golden-hour lighting.
Pre-wedding couple portraits
A pre-wedding shoot does not need an elaborate set to look beautiful. A suitable outdoor location, coordinated outfits and well-planned natural light can produce photographs that feel intimate and cinematic.
The couple can walk together, talk naturally or interact without looking at the camera. The photographer can then use side lighting and backlighting to create variety without repeatedly changing the pose.
Explore our pre-wedding photography services to learn more about planning a shoot around your preferred style.
Bridal portraits
Golden-hour light can bring out details in a bridal outfit, jewellery, makeup and veil. Side lighting can reveal the texture of embroidery, while backlighting can make a translucent dupatta or veil appear luminous.
The photographer should also pay attention to the direction of the light. A bride facing directly into a low sun may squint, and reflective jewellery may develop distracting highlights.
A slight change in angle can often produce a more flattering result.
Groom portraits
The groom’s portraits can benefit from the same lighting principles. Side lighting can add definition to the face and clothing, while backlighting creates a clean separation between the subject and the surroundings.
Rather than using identical poses for both partners, a photographer can use different compositions while maintaining a consistent visual style across the couple’s photographs.
Family portraits and candid moments
Golden hour is not only for romantic photographs. It can also work for family portraits, relaxed interactions and candid moments between wedding functions.
However, a wedding photographer should never delay an important ritual or leave essential coverage unattended simply to capture sunset portraits. Family photographs, ceremony timings and the couple’s comfort remain priorities.
For genuine expressions and unscripted interactions, explore Studio Rollii’s candid wedding photography.
Golden Hour Photography in Kanpur: What Should You Consider?
For couples planning a pre-wedding shoot or an outdoor portrait session in Kanpur, the main challenge is coordinating the light with the location, travel time and the rest of the day’s schedule.
The golden hour changes throughout the year. The time that works for an evening shoot in winter will not necessarily work in summer. Use the local sunset forecast for your chosen date rather than relying on a fixed clock time.
A few practical considerations can make the session more productive.
Seasonal weather: Clear skies can produce strong golden tones, while cloud cover may soften or obscure direct sunlight. Dust, haze and atmospheric conditions can also change the appearance of the light. A warm sunset is possible, but it cannot be guaranteed.
Travel and traffic: If the shoot requires travelling across Kanpur, include a realistic buffer for reaching the location, changing outfits and preparing equipment. Arriving late can cost you the best light, even if the location itself is excellent.
Location and background: Look for a setting with enough open sky to receive useful light, along with a background that complements the couple. An attractive location is not necessarily a good photography location if buildings or trees block the sun too early.
Wedding schedules: Wedding days often have tightly arranged functions. If you want sunset portraits, discuss the plan with your photography team in advance so that the session fits around the ceremony and family commitments.
Summer comfort: Outdoor sessions can remain uncomfortable even near sunset during hot weather. Plan for hydration, comfortable footwear between shots and a location where the couple can take short breaks.
Studio Rollii is based in Kanpur and works with couples planning wedding and pre-wedding photography. We recommend discussing your preferred visual style, location and schedule before deciding on the best time for the shoot.
How to Take Better Golden Hour Photographs
You do not need a professional camera to begin experimenting with golden-hour light. A smartphone can produce attractive results when you pay attention to the sun’s direction, exposure and composition.
1. Check the sunset or sunrise time
Use a reliable weather service or a sun-position application to find the local sunrise or sunset time. Treat this as a starting point rather than a guarantee of exactly 60 minutes of ideal light.
For an evening portrait session, arrive early enough to photograph before the sun reaches the horizon.
2. Try different lighting directions
Do not photograph every subject with the sun directly behind them.
Take a few photographs with the sunlight falling from the side, then try placing the sun behind the subject. Compare the resulting shadows, facial details and background separation.
This simple exercise teaches you more about natural light than relying on a preset alone.
3. Protect the highlights
Bright skies, reflective jewellery and sunlit clothing can lose detail if they become overexposed.
Check the brightest areas of your photograph. If your camera supports exposure compensation, a small adjustment towards a darker exposure may preserve sky and clothing details. Make sure the subject’s face does not become too dark in the process.
4. Focus on the subject’s face
In portrait photography, the background may be beautiful, but the subject should remain the visual priority.
Use your camera’s eye-detection autofocus if available. On a smartphone, tap the face to focus and check that the exposure remains appropriate.
5. Choose camera settings that suit the scene
There is no single set of camera settings that works for every golden-hour photograph. The right settings depend on the camera, lens, movement and available light.
For a starting point with a camera in manual mode:
Aperture: Try f/1.8–f/2.8 for a shallow depth of field if your lens supports it, or use a narrower aperture when more of the scene needs to remain sharp.
Shutter speed: For a relatively still portrait, begin around 1/250 second and adjust according to movement and focal length. Faster shutter speeds may be needed for walking couples or active children.
ISO: Start at ISO 100–200 in bright conditions and raise it as the light fades if necessary.
White balance: Auto white balance is a reasonable starting point. For a consistent series, consider a fixed daylight setting or a suitable Kelvin value, then review skin tones.
These are starting points, not strict rules. If the light becomes dimmer, a photographer may need to adjust the shutter speed, aperture or ISO to maintain a usable exposure.
6. Avoid excessive editing
Golden-hour photographs already contain a distinctive quality of light. Excessive orange saturation, heavy skin smoothing and exaggerated contrast can make the final image look artificial.
Aim to retain natural skin tones, preserve detail in the highlights and maintain a believable balance between warm sunlight and cooler shadows.
The best edit should support the light that was present when the photograph was taken.
Golden Hour vs Midday Photography
Golden hour is useful for a particular visual style, but midday light has its own advantages. The right choice depends on the subject and the photograph you want to create.
| Feature | Golden hour | Midday |
|---|---|---|
| Light direction | Low and directional | Usually higher and more overhead |
| Colour | Often warm and golden | Often more neutral or cool, depending on conditions |
| Shadows | Long, with changing intensity | Often short, hard and pronounced in direct sun |
| Portraits | Well suited to warm, atmospheric portraits | May require open shade, diffusion or fill light |
| Background | Can create glowing edges and depth | Can produce strong contrast and bright highlights |
| Availability | Limited period around sunrise or sunset | Usually available for longer, though the quality varies |
A skilled photographer can make beautiful photographs at either time. Golden hour simply offers a different set of lighting opportunities.
Common Golden Hour Photography Mistakes
Even beautiful sunlight cannot compensate for poor timing or careless exposure. Watch out for these mistakes.
Arriving at sunset instead of before it: By the time the sun reaches the horizon, the strongest direct golden light may already be gone.
Pointing the camera into the sun without checking exposure: Backlighting can be beautiful, but it may leave the subject underexposed or create distracting lens flare.
Assuming every sunset will be golden: Cloud cover, haze and the surrounding environment affect the result. Have an alternative lighting plan.
Using the same angle throughout the session: Small changes in position can transform the light falling on the subject. Explore side lighting, backlighting and front lighting.
Ignoring the background: A bright patch, distracting object or crowded background can weaken an otherwise beautiful portrait.
Over-editing skin tones: Increasing warmth too aggressively can make skin and bridal outfits lose their natural colours.
Treating the golden hour as more important than the occasion: During a wedding, photography must work around the celebration. A beautiful portrait is valuable, but not at the expense of an important family moment or ritual.
Frequently Asked Questions About Golden Hour Photography
What is the golden hour in simple words?
Golden hour is the period shortly after sunrise or shortly before sunset when sunlight often looks warmer and arrives at a lower angle. It is popular for portraits, wedding photography and landscapes because it can create attractive shadows, warm colours and a gentle glow.
Is golden hour always exactly one hour long?
No. The term is a general description, not a fixed duration. The usable period can be shorter or longer depending on the season, location, terrain and weather.
Is morning or evening golden hour better for photography?
Both can produce excellent photographs. Morning may offer quieter surroundings and a fresh atmosphere, while evening can fit more easily into many pre-wedding schedules. Choose according to the desired look, location and practical arrangements.
What is the best time for golden-hour photography in Kanpur?
The best time depends on the date. Check the local sunrise or sunset time for Kanpur and plan your shoot around the period of low-angle sunlight before sunrise or sunset. Arrive early to allow time for preparation and changing light.
Is golden hour good for pre-wedding photography?
Yes. The warm light and long shadows can create romantic portraits, especially when the couple is photographed outdoors. Good results still depend on composition, posing, exposure and the photographer’s ability to work with changing light.
Can golden-hour photography be done with a mobile phone?
Yes. Modern smartphones can capture attractive golden-hour photographs. Keep the subject in focus, avoid losing detail in bright skies and experiment with side lighting and backlighting. Avoid digital zoom when it significantly reduces image quality.
Do I need an expensive camera for golden-hour photography?
No. The timing and direction of the light matter more than the price of the camera. Professional cameras and lenses provide greater control in difficult conditions, but beginners can learn the fundamentals with a basic camera or smartphone.
Can golden-hour photographs be taken on cloudy days?
Yes, although the effect may differ. Clouds can soften the light and reduce harsh shadows, but thick cloud cover may prevent the warm, direct sunlight associated with golden hour. The photographer should adapt the composition and exposure to the available light.
Is golden hour better than blue hour?
They serve different purposes. Golden hour generally offers warm, directional sunlight, while blue hour occurs around dawn or dusk when the sun is below the horizon and the ambient light takes on cooler blue tones. Golden hour often suits warm couple portraits; blue hour can be useful for dramatic cityscapes and photographs featuring illuminated buildings.
Can wedding photographers shoot during golden hour at a banquet hall or indoor venue?
Yes, but the opportunities depend on the venue’s windows, outdoor spaces, surrounding buildings and the direction of sunlight. If direct sunlight does not reach the portrait area, a photographer may use window light or professional lighting equipment instead.
How should couples plan a golden-hour pre-wedding shoot?
Choose the date and location first, check the local sunset time, and coordinate outfits, makeup, travel and preparation accordingly. Share your preferred style with your photographer and allow enough time to experiment with different lighting directions.
Make Natural Light Part of Your Wedding Story
Golden hour is not a special camera setting or an editing effect. It is a brief opportunity to work with sunlight when its angle, colour and intensity can be especially useful for photography.
For couples, the practical lesson is simple: plan outdoor portraits around the available light, leave enough time to reach the location and trust your photographer to adapt as the sun changes.
At Studio Rollii, we believe wedding photographs should preserve both the appearance and the feeling of your celebration. If you are planning a wedding or pre-wedding shoot in Kanpur, explore our wedding photography services and discuss how natural light can support the style you want.
Visit Studio Rollii blog section to learn more about our photography services and plan your next shoot.